In this segment, we are going to show you how to “Install PiVPN on Raspberry Pi inside DietPi”
What is DietPi?
DietPi is an extremely lightweight operating system, start at 400MB in size (3x lighter than ‘Raspbian Lite’). With features of low process/memory footprint and DietPi-RAMlog installed by default, DietPi allows you to get the maximum performance from your device. Source// DietPi |  |
Software Required :
| Equipment Required | Optional | ||
| Raspberry Pi 4 | Case | ||
| SD Card | Raspberry Pi Keyboard | ||
| Ethernet Cable | Mouse | ||
| Power Adapter | |||
| External HDD | |||
| Shop now | |||
DietPi Installation Guide
What is PiVPN Server?
PiVPN (Virtual Private Network) is one of a few different ways you can access a raspberry pi remote computer. By using PiVPN we can easily create our VPN server and that will help us in the absolute easiest way to install and run your VPN. |  |
Package Required to Install
- PiVPN – OpenVPN installer & management tool
Installation
- First of all, we need to open Wireless Network Watcher to access the IP Address of our Raspberry Pi.
- Then we need to open SSH console Putty and type the IP Address to connect the DietPi CLI.
- After we logged in to DietPi, then you need to type a command to access the dietpi-software.
- Now, navigate to Software Optimized and select PiVPN by using the Spacebar and press OK.
Steps
- Setup Static IP and note down the IP Address.
- Select User Name
- Enable the Unattended Upgrades
- Select UDP protocol, Bevideo it is Faster than TCP
- Now, Select the Port Number. 1194 is the Default Port you can type any other port that you want.
- Select the Default Level of Encryption if you select a higher level of Encryption, the key will be strong but take more time to create.
- Now, Select your Public IP Address If you have a static IP Address then Choose the first option. Otherwise, we need to set up a Dynamic DNS.
- Now, we need to select the DNS Provider. You can select the Default Option.
- Then navigate to Install and press OK. After that installation will take around 5-10 min to complete the setup.
- Once the setup completes the system will reboot to finalize the settings.
Setting up Port Forwarding on Router
- To forward the port on the router, we need to know the IP Address of our router.
- To check the router IP Address use Wireless Network Watcher and it will display the router IP Address.

- Type this IP Address in your browser and it will open the login page for your router.
- Now, you need to enter the username & password and login to your router.
- If you don’t know the username & password of your router you can always ask your ISP.
- For personal routers, you can always check online for default username & password for the router.
Setting up Dynamic DNS
- First of all, we need to visit the DUCKDNS website to create a Free Dynamic DNS for our Public IP.

- You can use any of the above methods to login to the DUCKDNS website and create a subdomain for your website.
- Once you logged in then you can create a subdomain for your Public IP Address.
- That you can use to visit OMV from the Internet.

- For example, in my case I have created omvpcmac as my subdomain, So, I can access it as omvpcmac.duckdns.org
- You can create 5 subdomains on the Duck DNS account for free.
Add Clients to VPN Server
- Command: pivpn add
- Type the User Name and then Password 2 Times.
Download Client File
- Location : home/dietpi/opvns
- Tools use to Download Client File
FTP
WINScp
- Otherwise just share the folder over the network.
- cd home/dietpi/opvns
- Type ls to check the file is created or not.
- Once, you see your file then type python -m SimpleHTTPServer 8080
- This command will share the current folder over the Network.
- You can download the file by typing the IP Address:8080 in your web browser.
Configure OpenVPN Client
- You can directly download OpenVPN software from the download link.
- After the download finish, you can install the software as shown in the video.
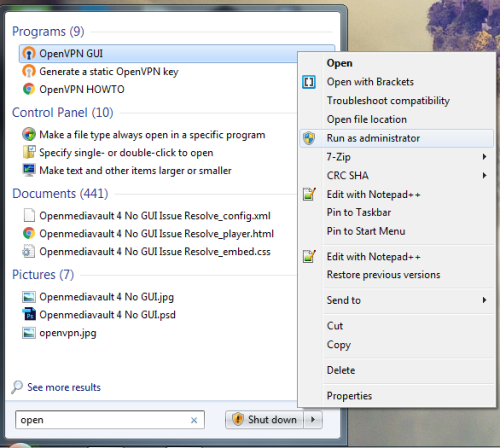
- Once, the installation finish you need to open the software by right click on it and choose “Run as Administrator“

- Default Path to save the .ovpn file or we can say configuration files : C:\Program Files\OpenVPN\config
- Now, you can save your downloaded configuration files to the config folder, and then it will appear in VPN Client.

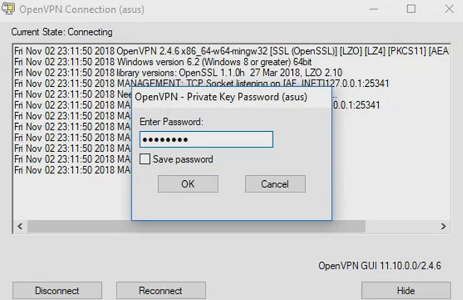
- Then we can select the configuration file by clicking on it and enter the password to connect to it.

- If the password is correct you can easily connect to the server and the OpenVPN icon changed its color to green.

Download & Setup VPN Software for Android
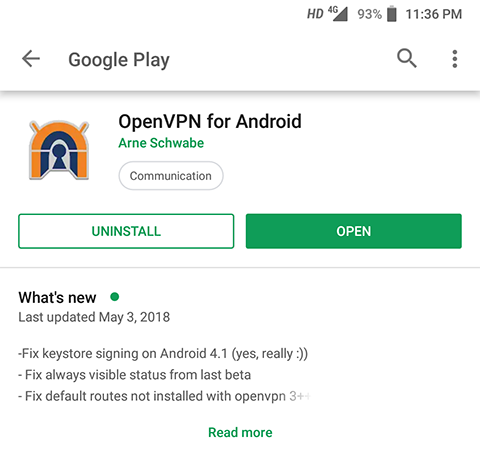
- Open play store in your Android Device and look for OpenVPN for Android.
- If the app is already installed in your device it will ask you to open the app.
- Otherwise, it will give you an option to install the app.

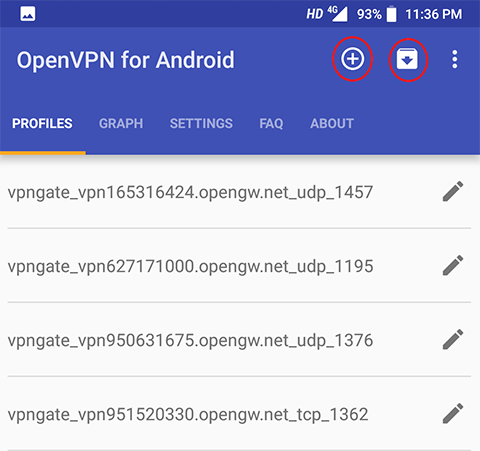
- Once the “OpenVPN for Android“ app is installed then use the downloaded config file to connect to the VPN server.

Please check out my other articles:
- Lifetime Free VPN for Windows & Android
- Fastest Free VPN for Windows, Mac, and Android
- How to Setup Free VPN on macOS for all models
- Free VPN Lifetime Windows & Android
Did you find us helpful?
| Subscribe our YouTube Channel | |
| Support us on Patreon | |
| Like us on Facebook | |
| Share This Article with others | |


