In this segment, we are going to show you how to “Install motionEyeOS on Raspberry Pi all models “
What is motionEyeOS?
 | motionEyeOS is a Linux distribution that turns a single-board computer into a video surveillance system. The OS is based on BuildRoot and uses motion as a backend and motionEye for the frontend. You can support the development of motionEyeOS by making a small donation. |
![[paypal]](https://www.paypalobjects.com/en_US/i/btn/btn_donate_LG.gif)
Software Required :
| Equipment Required | Optional | ||
| Raspberry Pi 4 | Case | ||
| SD Card | Raspberry Pi Keyboard | ||
| Ethernet Cable | Mouse | ||
| Power Adapter | |||
| Raspberry Pi Camera Module | |||
| Shop now | |||
motionEyeOS Installation
- Download motionEyeOS from Official Website: motionEyeOS
- Format the SD Card using: SD Card Formatter Tool.
- Then write the image to the SD Card using: Etcher

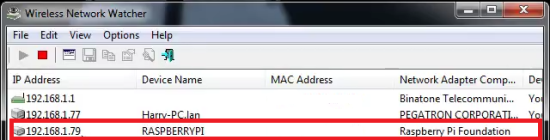
- Now, Its time to turn on the device and run the Wireless Network Watcher to check the IP Address of Raspberry Pi.
Access motionEyeOS Web Interface
- Now we use the RaspberyPi IP Address to access the motionEyeOS Web Interface.
- It will directly take us to the motionEyeOS Login Screen.
- motionEyeOS Default Login.

Default Username : admin
Default Password : blank
- Once, we logged in to motionEyeOS then we have to do 2 important steps.
- Set a new password for the Admin account.
- Enable the Advanced Settings.
- Then click on Apply.
Connecting USB Camera to motionEyeOS
- USB camera will be automatically detected by the system. No configuration required.
Connecting Network Camera to motionEyeOS
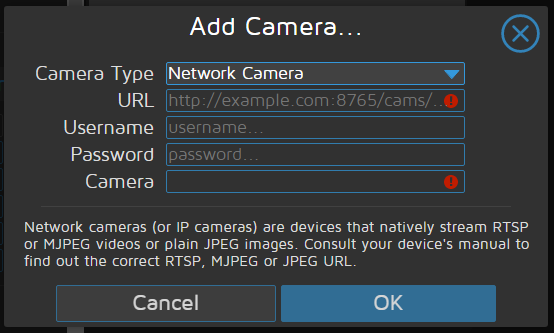
Camera Type : Network Camera
URL : Type Camera IP Address
Username : Type Camera Username {if required}
Password : Type Camera Password {if required}
Camera : Automatically Detected
Setting up Static IP Address
- To set up the Static IP Address on motionEyeOS, We need to navigate to Network.
- Now, select IP Configuration and then set it to Manual (Static IP).

- After the change the IP Address and leave other settings as it is and press Apply.
Setting up Motion Triggered E-mail Notifications
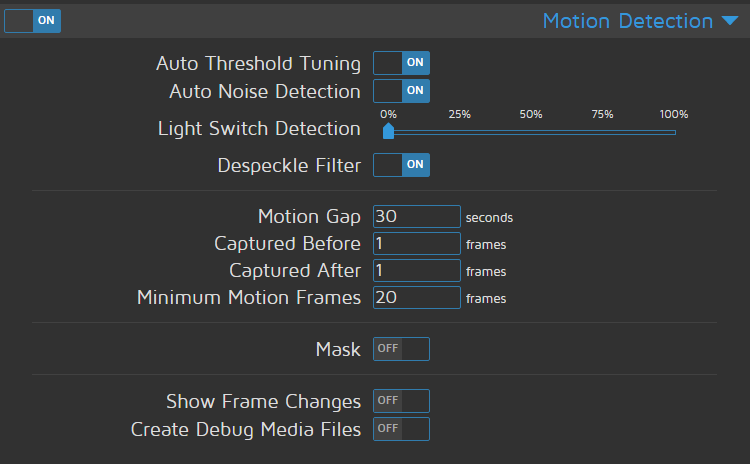
- First of all, we need to enable Motion Detection.

- Now from Motion Notifications, we need to enable Send An E-mail.

Email Addresses : Type e-mail address where you want notifications, separated by comma's
SMTP Server : SMTP Server Address
SMTP Port : SMTP Port number
SMTP Account : Your Email Address
SMTP Password : Your Email Password Address
From Address : Leave it Blank, or you can choose a Custom Email Address
Use TLS : Depend on your server
Attached Pictures Time Span : Set 0 if you don't want picture notification. Otherwise set according to your need.
Setup FTP Uploads
- Services enable all FTP Options.
Enable FTP Server : ON
Require FTP Authentication : ON
Enable FTP Write Support : ON
 Now, we need to navigate to File Storage –> Upload Service and choose FTP Server.
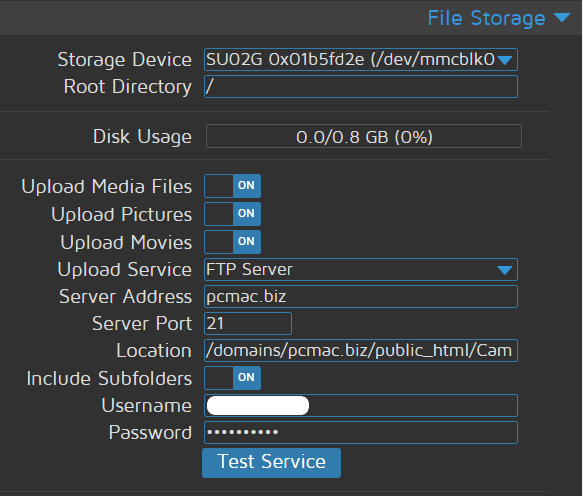
Upload Media Files : ON
Upload Pictures : ON
Upload Movies : ON
Upload Service : FTP Server
Server Address : Your Website Address
Server Port : Default is 21
Location : Location of Folder where to want to save the files
Include Subfolder : ON
Username : User ID
Password : Password
- Create a separate folder for your CAMERA for example CAM01.
- Once you fill all the details click on Test Service.
- If all the details are correct you will see this Message: Access the Upload Service Succeeded.
Setup Google Drive Uploads
- Now, we need to navigate to File Storage –> Upload Service and choose Google Drive.

Upload Media Files : ON
Upload Pictures : ON
Upload Movies : ON
Upload Service : Google Drive
Server Address : Your Google Drive Folder Location
Include Subfolder : Default is 21
Clean Cloud : ON [If you want to delete the file from cloud when it delete from local storage]
Authorization Key : Get it by Clicking on Obtain Key.
> Authorization Key 

- Create a separate folder for your CAMERA for example CAM01.
- Once you fill all the details click on Test Service.
- If all the details are correct you will see this Message: Access the Upload Service Succeeded.
Setup Google Photo Uploads
- Now, we need to navigate to File Storage –> Upload Service and choose Google Photo.
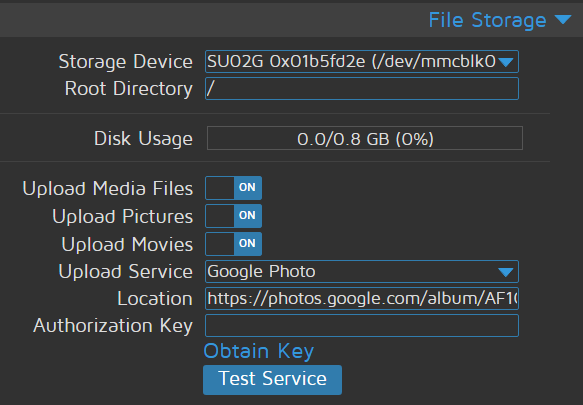
Upload Media Files : ON
Upload Pictures : ON
Upload Movies : ON
Upload Service : Google Photo
Server Address : Your Google Photo Folder Location
Authorization Key : Get it by Clicking on Obtain Key.
> Authorization Key
- Create a separate folder for your CAMERA for example CAM01.
- Once you fill all the details click on Test Service.
- If all the details are correct you will see this Message: Access the Upload Service Succeeded.
Accessing motionEyeOS from Outside Network
- To access the motionEyeOS from the Internet, we need to complete 2 steps.
- Port Forwarding
- Setup Dynamic DNS [In case you don’t have a Static Public IP Address]
 Setting up Port Forwarding on Router
- To forward the port on the router, we need to know the IP Address of our router.
- To check the router IP Address we can use the Wireless Network Watcher.
- It will display the router IP Address as shown below.

- Type this IP Address to your browser and it will open the login page for your router.
- Now, you need to enter the username and password and login to your router.
- If you don’t know the username and password of your router you can always ask your ISP.
- For personal routers, you can always check online for the default username and password for the router.
- In my case I need to navigate to services and then move to Port Forwarding, Your’s might be different.
- Then you need to forward port 8081, to the Raspberry Pi IP Address.

 Setting up Dynamic DNS
- First of all, we need to visit the DUCKDNS website to create a Free Dynamic DNS Domain for us.

- You can use any of the above methods to login to the DUCKDNS website and create a sub-domain for your website.
- Once you logged and create a sub-domain for your motionEyeOS and you can visit motionEyeOS by that address.

- For example, in my case, I have created meos as my subdomain.
- So, I can access it as meos.duckdns.org.
- You can create 5 subdomains on the Duck DNS account for free.
In conclusion
- You are ready to use motionEyeOs on your Raspberry Pi.
- If you come across any issues or have some feedback related to this tutorial, Please share your thoughts.
Did you find us helpful?
| Subscribe our YouTube Channel | |
| Support us on Patreon | |
| Like us on Facebook | |
| Share This Article with others | |

Highly energetic post, I loved that bit. Will there be a part 2?
Thanks for appreciating my work, You will see the part 2 in future.
hi!,I love your writing very much! proportion we keep up a correspondence more approximately your post on AOL? I require a specialist in this house to resolve my problem. May be that’s you! Taking a look forward to look you. |
Please contact me on Telegram. Link available on the website 👍
Helpful information. Lucky me I found your web site by chance, and I am stunned why this coincidence didn’t took place in advance! I bookmarked it.|
Thanks for the appreciation.
Its not my first time to go to see this website, i am browsing this web site dailly and get nice facts from here daily.|
Thanks 😊
Great post.|
Thanks
Have you ever thought about publishing an ebook or guest authoring on other websites? I have a blog centered on the same subjects you discuss and would really like to have you share some stories/information. I know my visitors would appreciate your work. If you are even remotely interested, feel free to send me an email.|