Best Voice Over settings for Audacity

In this segment, we are going to show you “Best voice over settings for Audacity for YouTube and other online Platform“

What is Audacity?

Audacity

Below we have mentioned 5 steps to improve your voice over through Audacity. You need to do the same steps in your audio to get best result. Kindly follow all the steps in there order from 1 to 5.

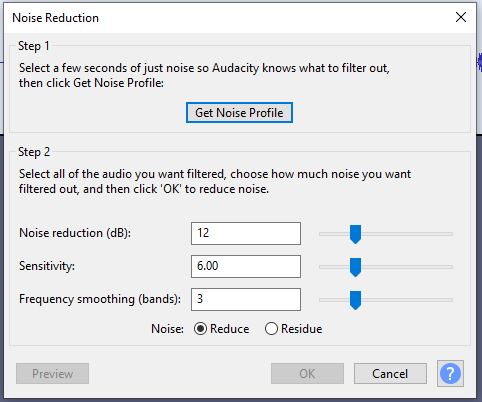
Step-1. Noise Reduction

Noise Reduction can reduce constant background sounds such as hum, whistle, whine, buzz, and “hiss”, such as tape hiss, fan noise or FM/webcast carrier noise. It is not suitable for individual clicks and pops, or irregular background noise such as from traffic or an audience.

  •  Accessed by: Effect > Noise Reduction
  •  Get Noise Profile
    • To use Noise Reduction, you need a region in the waveform that contains only the noise you want to reduce.
    • Be aware that it may be impossible to get a satisfactory removal when the noise is very loud, when the noise is variable, when the music or speech is not much louder than the noise or when the noise frequencies are very similar to those of the music or speech.

Audacity

  •  Reduce the Noise
    • Once the noise range selected you need to again navigate to Effect > Noise Reduction and than click on OK to apply the Noise reduction settings.
    • If you still able to here the noise in the audio repeat the second step again.
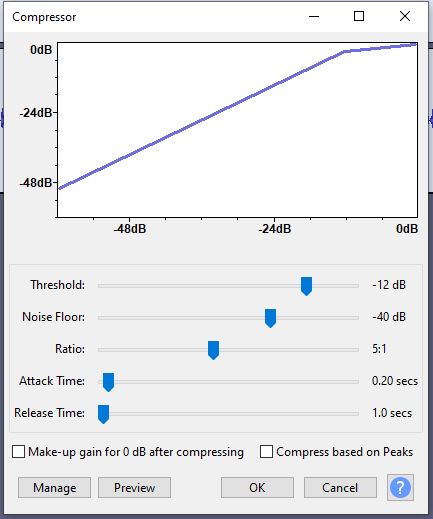
Audacity

Step-2. Compressor

  •  The Compressor effect reduces the dynamic range of audio. One of the main purposes of reducing dynamic range is to permit the audio to be amplified further (without clipping) than would be otherwise possible. Therefore by default the Compressor amplifies audio as much as possible after compression.
  • The resultant increase in average or RMS level can be useful for audio played in a noisy environment such as in a car, or in speech, to make a distant voice sound as loud as a close one. Because the gain changes relatively slowly, a compressor does not distort the signal in the way that a Limiter or clipping would do.
  •  Accessed by: Effect > Compressor

Audacity

Step-3. Limiter Filter
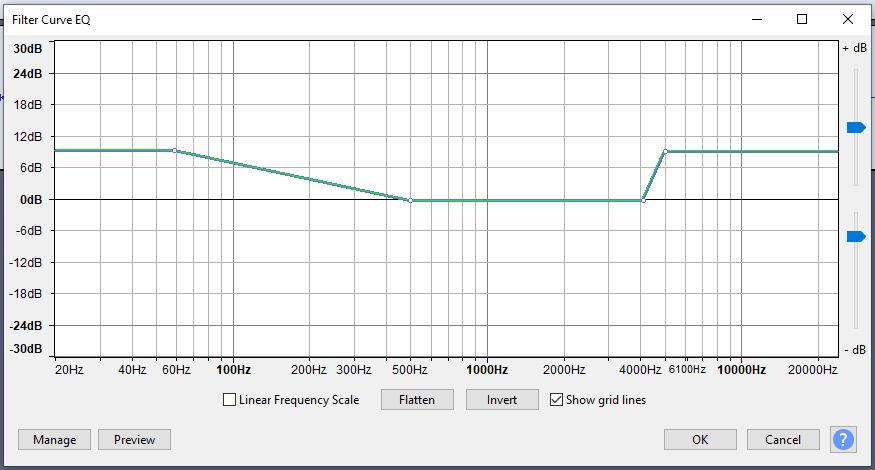
  •  Use the Limiter effect to pass signals below a specified input level unaffected or gently reduced, while preventing the peaks of stronger signals from exceeding this threshold. Mastering engineers often use limiting combined with make-up gain to increase the perceived loudness of an audio recording during the audio mastering process.
  • This limiter effect provides two basic types of effect; “limiting” and “clipping”. The “limiting” effect is a special kind of dynamic compression that responds very rapidly to peaks in the waveform. The “clipping” effect is a kind of distortion that changes the shape of the waves by “clipping” off the high and low peaks.
  •  Accessed by: Effect > Limiter

Audacity

Step-4. Equalizer

  •  Filter Curve EQ is an equalization tool, it is an FFT (Fast Fourier Transform) filter. Equalization, is a way of manipulating sounds by Frequency. It allows you to increase the volume of some frequencies and reduce others. This is a more advanced form of the EQ and Tone controls on many audio systems.
  • As an example of equalization, the curve shown below changes the balance of high and low frequencies in the audio to make it sound like an AM radio broadcast. High frequencies (above 6000 Hz) and low frequencies (below 100 Hz) are reduced in volume by 20 dB.
  •  Accessed by: Effect > Filter Curve

Audacity

Step-5. Normalize

  •  Use the Normalize effect to set the peak amplitude of a single track, make multiple tracks have the same peak amplitude and equalize the balance of left and right channels of stereo tracks. Optionally you can remove any DC offset from the tracks.
  •  Accessed by: Effect > Normalize

Audacity

In conclusion

  •  If you apply the above settings to your audio file, you will see significant change in your Audio throughout the video. Feel free to share any suggestion regarding this post.

Please check out my other articles:

Did you find us helpful?

Subscribe our YouTube Channel YouTube
Support us on Patreon Patreon
Like us on Facebook facebook
Share This Article with others

Harish Kumar

As a founder of the PcMac YouTube channel and website, Our goal is to provide Free Technical help to people and spread knowledge to everyone.
0 0 votes
Article Rating
Subscribe
Notify of
guest
1 Comment
Oldest
Newest Most Voted
Inline Feedbacks
View all comments
Wes
Wes
1 year ago

Many Thanks