What is TightVNC?
As Windows-to-Windows Remote Desktop can, TightVNC supports not only graphics remoting but also
- Two-way clipboard transfer (text, bitmap, file)
- Audio redirection
- Drive redirection (mount local client drives on the remote machine)
- RDP transport is encrypted using TLS by default.
Software Required :
| Equipment Required | Optional | ||
| Raspberry Pi 4 | Case | ||
| SD Card | Raspberry Pi Keyboard | ||
| Ethernet Cable | Mouse | ||
| Power Adapter | |||
| External HDD | |||
| Shop now | |||
Raspbian OS Installation
- Download Raspbian OS from Official Website: raspberrypi.org
- Then write the image to the SD Card using: Etcher
- Now, Boot the Raspberry Pi with this SD Card, Follow the On-Screen Instructions and then open Terminal.
Update & Upgrade Raspbian
sudo apt-get update
sudo apt-get upgrade
Install Server
sudo apt-get install tightvncserver
sudo reboot
Starting Server
- After that, we need to set our TightVNC Password.
vncserver :1
Start Server on StartUp
- To start the service on startup we need to edit: sudo nano /etc/rc.local
- Then we need to add
su - pi -c '/use/bin/vncserver :1'
- above exit 0
- After that, press CTRL+X, then Y and hit ENTER to save the File.
- Then reboot the Raspberry Pi.
sudo reboot
On Windows Computer
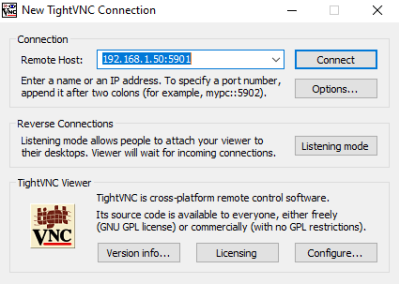
- Open TightVNC Viewer and enter the Raspberry Pi IP Address:5901 and click Connect.
Ex: 192.168.1.50:5901

- Enter the password that you have created at the time of Installation.
- To check the RaspberryPi IP Address from windows use Wireless Network Watcher.
Get RaspberryPi IP Address from RaspberryPi
sudo ifconfig
Reset Password
vncpasswd
In conclusion
- You are ready to use TightVNC on your Raspberry Pi.
- If you come across any issues or have some feedback related to this tutorial, Please share your thoughts.
Please check out my other articles:
- How to install OpenMediaVault 5 on Raspberry Pi All Models
- OpenMediaVault 5 NAS Server on Raspberry Pi 4
- Plex Media Server on OMV 5 inside Docker with Portainer using RPi 4
- How to Install Radarr on OpenMediaVault 5 inside Docker with Portainer using RPi 4
Did you find us helpful?
| Subscribe our YouTube Channel | |
| Support us on Patreon | |
| Like us on Facebook | |
| Share This Article with others | |


Thanks, works great but had to correct the value added to rc.local to
su – pi -c ‘/usr/bin/vncserver :1’
Welcome