In this segment, we are going to show you “How to Install OpenVPN Server on OpenMediaVault 5 using Raspberry Pi 4“
What is OpenVPN?
 | OpenVPN is open-source commercial software that implements virtual private network (VPN) techniques to create secure point-to-point or site-to-site connections in routed or bridged configurations and remote access facilities. |
It uses a custom security protocol that utilizes SSL/TLS for key exchange. It is capable of traversing network address translators (NATs) and firewalls.
OpenVPN was written by James Yonan and is published under the GNU General Public License (GPL). It allows peers to authenticate each other using pre-shared secret keys, certificates, or username/password. When used in a multi client-server configuration, it allows the server to release an authentication certificate for every client, using signatures and certificate authority. It uses the OpenSSL encryption library extensively, as well as the TLS protocol, and contains many security and control features. It has been ported and embedded in several systems. For example, DD-WRT has the OpenVPN server function. SoftEther VPN, a multi-protocol VPN server, also has an implementation of OpenVPN protocol.Source /> Wikipedia
Full credit for this tutorial goes to : ixdotai/openvpn- Checkout brief details about VPN: https://www.cloudzat.com/vpn-virtual-private-networks/
OpenMediaVault Versions :
OpenMediaVault 5 Installation Guide :
Software Required :
| Equipment Required | Optional | ||
| Raspberry Pi 4 | Case | ||
| SD Card | Raspberry Pi Keyboard | ||
| Ethernet Cable | Mouse | ||
| Power Adapter | |||
| External HDD | |||
| Shop now | |||
Create OVPN_DATA Volume
- First of all, we need to create a folder for OVPN_DATA and you can choose any name of your choice. Followed by initializing the $OVPN_DATA container that will hold the configuration files and certificates.
- Secondly, it is recommended to use the ovpn-data- prefix to operate seamlessly with the reference system service. Users can replace example with a descriptive name of their choice.
OVPN_DATA="ovpn-data-openvpn"
docker volume create --name $OVPN_DATA
Initiate OpenVPN Configuration
- To generate the configuration file for our OpenVPN server we need to create a Dynamic DNS address for our server.
Setting up Dynamic DNS
- Now, we need to set up a Dynamic DNS to resolve the issue of Public IP address that keeps changing from our ISP. For that, we need to visit the DUCKDNS website to create a Free Dynamic DNS for our Public IP.

- You can use any of the above methods to login to the DUCKDNS website and create a subdomain for free. Once you logged in and create a subdomain then you can use this address for your OpenVPN.
- In my case, I have created omvpcmac as my subdomain, You can create 5 subdomains account on Duck DNS for free.

docker run -v $OVPN_DATA:/etc/openvpn --log-driver=none --rm registry.gitlab.com/ix.ai/openvpn ovpn_genconfig -u udp://VPN.SERVERNAME.COM
- Once the Dynamic DNS successfully created we can replace the VPN.SERVERNAME.COM with our DUCKDNS address and run the container from the above command.
Result
Processing PUSH Config: 'block-outside-dns'
Processing Route Config: '192.168.254.0/24'
Processing PUSH Config: 'dhcp-option DNS 8.8.8.8'
Processing PUSH Config: 'dhcp-option DNS 8.8.4.4'
Successfully generated config
Cleaning up before Exit ...
Generate CA Certificate
- Eventually, we can go ahead and generate a CA certificate with the below command and a private key will generate which belongs to the PKI.
docker run -v $OVPN_DATA:/etc/openvpn --log-driver=none --rm -it registry.gitlab.com/ix.ai/openvpn ovpn_initpki
- Now we need to enter the password to secure the key and the result will look like this.
Result
Your newly created PKI dir is: /etc/openvpn/pkiGenerating a 2048 bit RSA private key ............................................................................+++ ....+++

writing new private key to '/etc/openvpn/pki/private/ca.key.XXXXCFGIEm'

Enter PEM pass phrase:

Verifying - Enter PEM pass phrase: ...

Common Name (eg: your user, host, or server name) [Easy-RSA CA]:CA creation complete and you may now import and sign cert requests. Your new CA certificate file for publishing is at:

/etc/openvpn/pki/ca.crtGenerating DH parameters, 2048 bit long safe prime, generator 2

This is going to take a long time ...

# Wait a whileEnter pass phrase for /etc/openvpn/pki/private/ca.key:

Check that the request matches the signature ...

Enter pass phrase for /etc/openvpn/pki/private/ca.key:

An updated CRL has been created.

CRL file: /etc/openvpn/pki/crl.pem
Start OpenVPN server process
Setting up Port Forwarding on Router
- To start with Port Forwarding, we need to know the router IP Address and for that, we are going to use Wireless Network Watcher as shown below.

- Once we have the correct IP Address, we can go ahead and log in to our router. If you don’t know the username & password of your router you can always ask your ISP for personal routers, you can always check online for the default username & password for the router.
- In my case, I need to navigate to services and then move to Port Forwarding, your’s might be different. After that, I can easily forward port 1194, to the Raspberry Pi IP Address.

docker run -v $OVPN_DATA:/etc/openvpn -d -p 1194:1194/udp --cap-add=NET_ADMIN registry.gitlab.com/ix.ai/openvpn
Produce a client certificate without a passphrase
- However to generate the client certificate we will use the below command and change CLIENTNAME to any name of your choice. Here we passed the nopass option with that option, the user can connect directly with the configuration file.
- In other words, this also means that if somebody gets the config file that we will generate in seconds, he or she can connect to our VPN server without the need for anything else. You will also be asked about the certificate authority password during the user creation.
docker run -v $OVPN_DATA:/etc/openvpn --log-driver=none --rm -it registry.gitlab.com/ix.ai/openvpn easyrsa build-client-full CLIENTNAME nopass
Result
........................................................+++
..........................................................+++
writing new private key to '/etc/openvpn/pki/private/CLIENTNAME.key.XXXXeoGIJE'
-----
Using configuration from /usr/share/easy-rsa/openssl-1.0.cnf
Enter pass phrase for /etc/openvpn/pki/private/ca.key:
...
Create and Download the client configuration with embedded certificates
- Lastly, we can generate a configuration file that will be sent to the user. We can use the below command to generate a new file for every other device or user.
- After that, we can change the CLIENTNAME to the name of your choice.
docker run -v $OVPN_DATA:/etc/openvpn --log-driver=none --rm registry.gitlab.com/ix.ai/openvpn ovpn_getclient CLIENTNAME > CLIENTNAME.ovpn
Download Client File
Location : "root"
Tools to download client file
FTP
WINScp
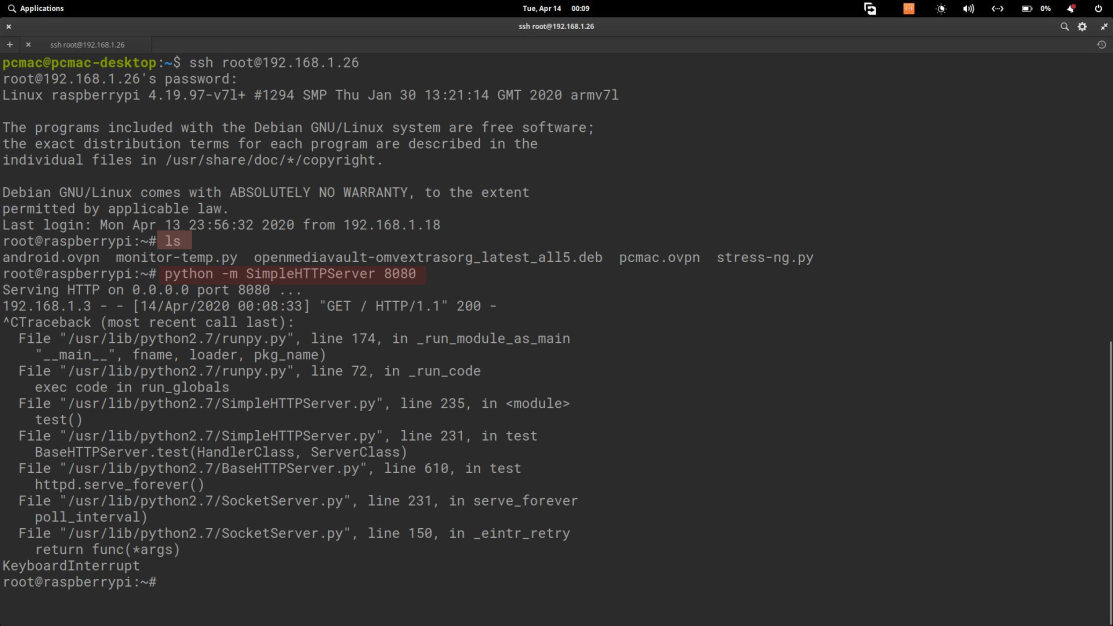
- Otherwise, just share the folder over the network. Type ls to check the file is created or not. After that, type python -m SimpleHTTPServer 8080

- The above command will share the current folder over the Network and you can download the file by typing the IP Address:8080 in your phone or computer web browser.

Configure OpenVPN Client for Windows
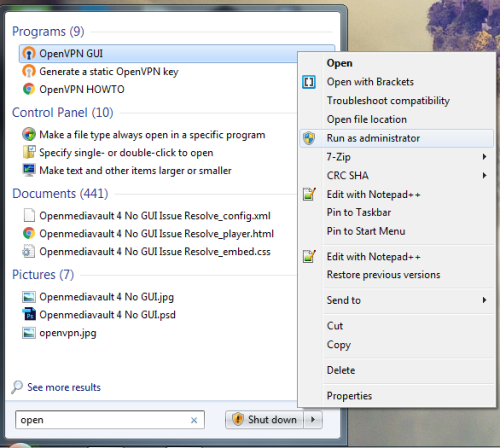
- To configure OpenVPN client for windows you need to download software from the download link and after the installation finish, you need to open the software by right click on it and choose “Run as Administrator“


- The default Path to save the .ovpn file or we can say configuration files is: C:\Program Files\OpenVPN\config.
- Similarly, you can save your downloaded configuration files to the config folder, and then it will appear in VPN Client.

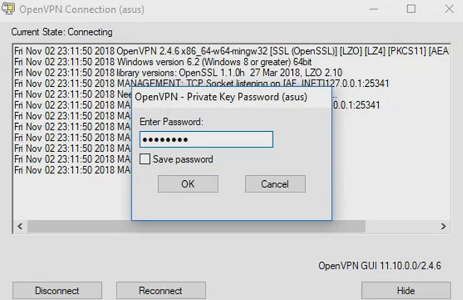
- After that, we can select the configuration file by clicking on it and enter the password to connect.

- If the password is correct you can easily connect to the server and the OpenVPN icon changed its color to green.

Download & Setup VPN Software for Android
- To install OpenVPN you need to download it from PlayStore and open it once installation finish.

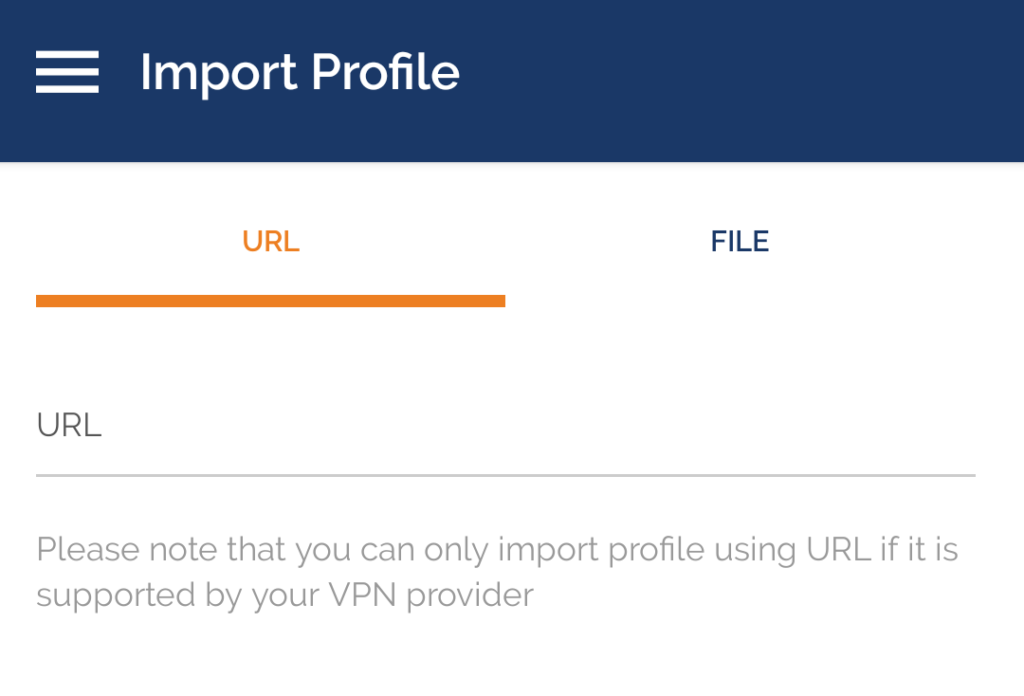
- After that, open the app and it will prompt you for 2 options. So, we need to select FILE and navigate to our download folder to import our configuration file.

Please check out my other articles:
Did you find us helpful?
| Subscribe to our YouTube Channel | |
| Support us on Patreon | |
| Like us on Facebook | |
| Share This Article with others | |


I did install the openvpn on mediavault 5 using this page, but the issue is when I reboot the openvpn does not restart.
What to do now, how to restart openvpn on each boot?