In this segment, we are going to show you how to install “Android TV on Raspberry Pi 4 Model B | Boot from USB”
Visit KonstaKANGOfficial Website for more Cool Stuff
Note: This image is only for advanced users.
What is Android TV?
Android TV is a version of the Android operating system by Google designed for digital media players, set-top boxes, soundbars, and TVs. Serving as a replacement for Google TV, it features a user interface designed around content discovery and voice search, surfacing content aggregated from various media apps and services, and integration with other recent Google technologies such as Assistant, Cast, and Knowledge Graph.
Source /> Wikipedia
Software Required :
| Equipment Required | Optional | ||
| Raspberry Pi 4 | Case | ||
| SD Card | |||
| Ethernet Cable | |||
| Power Adapter | |||
| Raspberry Pi Keyboard | |||
| Mouse | |||
| 3.0 Flash Drive | |||
| Shop now | |||
Raspberry Pi 4 Kit’s
We may earn a commission for purchases using our links. Learn more.
Keyboard Shortcuts
| F1 | F5 | ||
| F2 | F11 | ||
| F3 | F12 | ||
| F4 |
STEP- 1: Downloading & Installing “Android TV on Raspberry Pi”
- First of all, we need to download the “Android TV Image” image to set up the Raspberry Pi 4.
Formatting the SD Card
- Now, We need the SD Card Formatter tool to format the SD card.
- Once, the card is plugged in, It will automatically detect by the computer then you need to click on the format to format the Card.

Flashing the SD Card
- After the SD Card formatted successfully use Etcher and flash the Android TV Image to the SD card.

Insert the SD Card to Raspberry Pi
- Once the card successfully got flashed then plug it in the Raspberry Pi. Follow the setup wizard to boot into Android Home Screen.
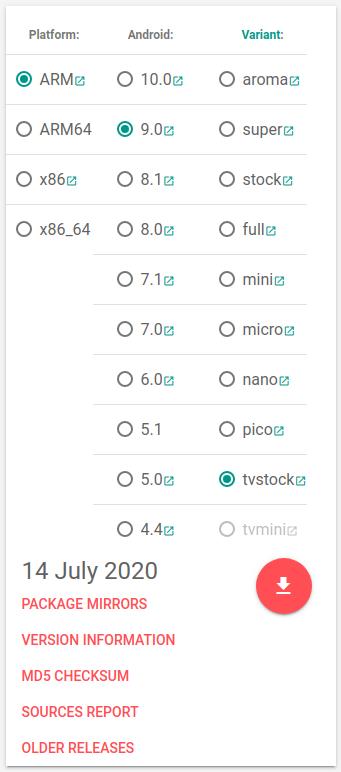
STEP- 2: Downloading Open Gapps
Visit the Official Open Gapps Website
- Select the Package as shown in the picture for minimum apps requirement. After that click on the download button to download the file.
STEP-3 : Enabling “Developer Options”, “Root Access”, “Terminal”
Enable Developer Options
- To enable Developer Options, We need to navigate to Settings –> “About phone” –> Click “Build Number” several times.
Enable Root Access
- To enable Root Access, We need to navigate to “Settings” –> “Developer Options” –> Enable “Root Access”.

Enable Terminal
- To enable Terminal Access, We need to navigate to “Settings” –> “Developer Options” –> Enable “Local Terminal”.
- Now, we need to reboot the device.
- Press & Hold F5 key, this will bring Power Options and you can reboot the device.
STEP- 4: Boot into “TWRP Recovery Mode”
Boot Android into TWRP Recovery Mode
- Open the Terminal App, Then type the below-given commands to Boot into “TWRP Recovery Mode”.
su
rpi4-recovery.sh
reboot
STEP- 5: Boot out from “TWRP Recovery Mode”
Boot into Normal Mode
- Mount –> Boot & Mount –> System, Then use the below-given command to Boot into Normal Mode.
rpi4-recovery.sh boot
- Similarly, we can use the other method if the above method not working.
- Navigate to install and select the file from the storage. i.e recovery2boot.zip
- This file will boot our system into Normal Mode.
STEP- 6: Installing Open Gapps in Android Pie
Boot Android into TWRP Recovery Mode
- Open the Terminal App, Then type the below-given commands to Boot into “TWRP Recovery Mode”.
su
rpi4-recovery.sh
reboot
Now, navigate to install and select the file from the storage. i.e open_gapps-arm-9.0-tvstock-xxxxxxxxxxx.zip.
- Now, once the installation finishes. Then go back and select wipe –-> Wipe Factory Reset
Boot into Normal Mode
- Mount –> Boot & Mount –> System, Then use the below-given command to Boot into Normal Mode.
rpi4-recovery.sh boot
- Similarly, we can use the other method if the above method not working.
- Navigate to install and select the file from the storage. i.e recovery2boot.zip
- This file will boot our system into Normal Mode.
Step-7: Boot from USB
- You need to install the Android TV os to USB 3.0 flash drive as mentioned above in the document. After that, you need to open the boot drive and make the below-given changes to the folders.
mv ramdisk.img ramdisk-sdcard.img
mv ramdisk-usb.img ramdisk.img
mv ramdisk-recovery.img ramdisk-recovery-sdcard.img
mv ramdisk-recovery-usb.img ramdisk-recovery.img
Step-8: Enable audio through 3.5mm jack
- If we want to enable the 3.5mm audio jack, then we need to open Terminal and use the below-given command.
su
rpi4-audio-jack.sh
Step-9: Resize system Partition
- If you want to extend your partition size in Android TV because by default this is a 4 GB image, remaining space on your sd card will remain unallocated.
- To resolve this issue we need to use Gparted in Linux system, this software is not available for macOS or windows.

- As you can see in the image you need to extend the size of 2.62GB partition.
Step- 10: Overclocking
Note: Overclocking may damage your Raspberry Pi, for that reason you must have a good cooling system installed on your Raspberry Pi 4 Before overclocking.
Overclock at your own risk.
Active Cooling Solutions
Passive Cooling Solutions
Compatible Mini Keyboard & Air Remote
Maximum Overclock for Raspberry Pi 4: 2.147 GHz max clock speed GPU Frequency: 750 We are going to overclock are system from 700 MHz to 2000 MHz. We also change the over voltage to 6 for maximum power.
- To overclock the raspberry pi 4 we need to open the 134 MB folder and then look for config.txt file. After that, open the file into the Text editor and add the below-given lines at the end.
over_voltage=6
arm_freq=2000
gpu_freq=750
- If you have resolution issues you can force 1080 resolution by adding this to config.txt
hdmi_ignore_edid=0xa5000080
Step- 11: Optimize Android Pie 9.0
- First of all open settings and navigate to Apps & Notifications. Here you need to disable all the apps which you don’t need or require.
- After that we need to open Developer options from Settings –> System –> Developer Options and change the below-given settings.
Don't keep activities : Turn on
Windows animation scale: Animation off
Transition animation scale: Animation off
Animator duration scale : Animation off
Thanks to KonstaKANG for his Cool Stuff. Please support his work.
In conclusion
- You are ready to use Android TV on your Raspberry Pi 4.
- If you come across any issues or have some feedback related to this tutorial,
- Please share your thoughts. Smile (“_”)
Please check out my other articles
Did you find us helpful?
| Subscribe our YouTube Channel | |
| Support us on Patreon | |
| Like us on Facebook | |
| Share This Article with others | |


how to switch Audio to 3.5 mm Jack or Bluetooth ? It always takes HDMI audio to TV / Monitor
https://konstakang.com/devices/rpi3/LineageOS16.0/
Please follow the Guide for solution.
Hello, instead using raspberry Pi can I use mac mini and deploy Android TV on External flash drive and connect it to Mac min
This os is built for raspberry pi. Please look for another operating system that supports your requirement
Hello,
When I run the rpi4-recovery.sh command and then reboot my Pi4 just hangs at the multi-coloured screen and never comes back.
Any suggests? The video says to enable the USB debug but in the steps I didn’t see it. Not sure if I am missing anything.
Thank you.
Great article, thanks!
Just one question.
Is the “Step-7: Boot from USB” needed since now from September raspberry supports USB boot?
Can’t access any files from USB drive in raspberry pi android TV. I want to play videos from VLC app. what is the solution. Thanks.
Kindly install ES Explorer or any other file explorer.
Obrigado pela explicação, foi o único que consegui instalar o android no raspberry. Parabéns!
Hi,
Thanks for the great explanation. Very useful!
I’d like to know if there is a way to have in the same RPi4 an Android and multiple Linux distribs (Ubuntu, Kali, …)?
–> via containers (docker)? other way? or impossible?
Regards
AyG
It comes with a tool to kill running applications, direct cloud storage (via Dropbox, Google Drive or Skydrive) and numerous additional features such as an FTP client, so you can use it both on your mobile device. PC. ES File Explorer is one of the best Android file managers. If you are looking for one of the best file management apps on Android phones or tablets, we suggest you install it. ES File Explorer Mod is an excellent tool for managing files and programs.