In this segment, we are going to show you “OpenMediaVault Boot from USB/SSD without using SD card on Raspberry Pi 4 “
What is OpenMediaVault?
 | OpenMediaVault (OMV) is a free Linux distribution designed for network-attached storage (NAS). The project’s lead developer is Volker Theile, who instituted it in 2009. OMV is based on the Debian operating system and is licensed through the GNU General Public License v3. |
Source//Wikipedia
Software Required :
For this Practical, we need a Raspberry pi 4 board with Raspberry Pi OS Desktop version installed.
| Equipment Required | Optional | ||
| Raspberry Pi 4 | Case | ||
| SD Card | Raspberry Pi Keyboard | ||
| Ethernet Cable | Mouse | ||
| Power Adapter | |||
| External HDD | |||
| Shop now | |||
- To start the practical first, we need to update and upgrade the system. Followed by RPI-update to get the latest Firmware updates as well.
sudo apt update
sudo apt upgrade
sudo rpi-update
sudo reboot
- Once the process complete then we can go ahead and reboot the system.
- After the system reboot completes, we can go ahead and start installing RPI-EEPROM and edit its file and replace critical updates to beta updates.
sudo apt install rpi-eeprom
sudo nano /etc/default/rpi-eeprom-update
- Now we can use crtl-x and Y, to save the file configuration.
sudo rpi-eeprom-update -d -f
sudo rpi-eeprom-update -d -f /lib/firmware/raspberrypi/bootloader/beta/pieeprom-2020-05-15.bin
- Once the file saved successfully, then we can go ahead and update the RPI-EEPROM to beta updates by using the above commands. Then we can reboot the system again.
- Now we are ready to check out the latest BootLoader version by using below given command.
vcgencmd bootloader_version
Result:

- Once we are on the latest boot version i.e of the latest month, then we can check the BootLoader config.
vcgencmd bootloader_config
Result:

- Here we need to check for BOOTORDER=0xF41. Here, 4 stands for booting from USB, and 1 is booting from the SD Card.
- Once all the above processes completed successfully then we can go ahead and connect a USB/SSD to our Raspberry Pi 4 to copy the SD Card into the USB drive.

- To initiate this process we need to navigate on to Raspberry Pi icon and move to Accessibility then open SD Card Copier. Here we need to select our SD Card in Copy From Device and then Copy To Device will be our USB drive.
- And then we need to hit start it will take around 5 minutes to complete the process.

- Now, we need to turn off the Raspberry Pi either from Terminal or from Pi icon. Then wait for the Pi to completely turn off and then remove the SD Card and leave the USB drive in the Pi.
- At this stage, we are ready to boot our system from the USB drive. Now you can turn on the Pi and it will boot into Raspberry OS from the USB drive.
- Note: If the system fails to boot from USB/SSD we can go ahead and copy all .elf and .dat files from our SD card into the boot directory of our new USB/SSD.
OpenMediaVault Installation
- Finally, we are all set to install OpenMediaVault to our Raspberry Pi OS which is right now working from the USB drive. To install the OpenMediaVault we need to run the below-given command and follow the on-screen instructions.
wget -O - https://github.com/OpenMediaVault-Plugin-Developers/installScript/raw/master/install | sudo bash
- If the download process halt in between press q to quit that particular page.
- At last, we need to reboot the system, after the successful download of OpenMediaVault.
sudo reboot
Access OpenMediaVault Web Interface
- To access the OpenMediaVault Web Interface we need to use the same IP Address of our Raspberry Pi after 2-3 minutes.
OpenMediaVault Address = Your Raspberry Pi IP Address
- After that, we need to enter the Username & Password and login to our OpenMediaVault.
Default Username: admin
Default Password: openmediavault

OpenMediaVault Configuration
- Firstly, you need to change Auto logout to Disabled.
- Secondly, change the Web Administrative Password to a strong password of your choice.
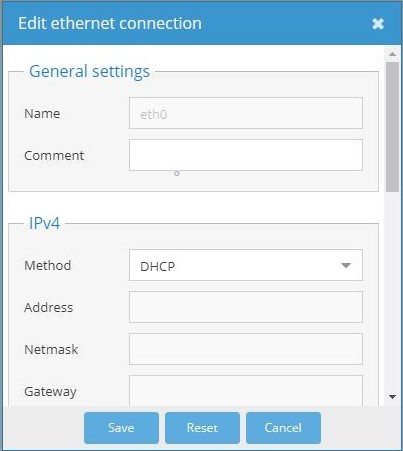
- Thirdly, navigate to system > Network and add an Ethernet interface.
- Under General Settings, we need to select our eth0 Ethernet Interface.
- After that under IPv4, we need to select DHCP and save the configuration.
- Finally, we need to navigate to services to SSH enable Permit root login.
Default Username: pi
Default Password: use the password that you have changed.
OpenMediaVault SSH Login
- After that, open Putty uses the Raspberry Pi address to log in as root.
- Further, It will prompt you to change the password on the first login.
OpenMediaVault Update & Upgrade
- Further, we need to Update & Upgrade our Openmediavault Packages.
sudo su
apt-get update
apt-get upgrade
Please check out my other articles:
In conclusion
- You are all set to Boot your OpenMediaVault on Raspberry pi 4 from a USB/SSD drive for better performance.
- Enjoy using OpenMediaVault, share your thoughts about the article.
Did you find us helpful?
| Subscribe our YouTube Channel | |
| Support us on Patreon | |
| Like us on Facebook | |
| Share This Article with others | |


Latest stable firmware 2020-06-15
sudo rpi-eeprom-update -d -f /lib/firmware/raspberrypi/bootloader/stable/pieeprom-2020-06-15.bin
Thanks,
pi@raspberrypi:~ $ vcgencmd bootloader_version
Jun 15 2020 14:36:19
version c302dea096cc79f102cec12aeeb51abf392bd781 (release)
timestamp 1592228179
Hello,
I am new to all of this and I just installed Raspbian Lite and OMV 5 to my SD card and saw this afterwards. Is there a way that I can move my Raspbian install and my OMV 5 install to my SSD all at once and have it boot from that instead of the SD card in the Raspberry Pi? In the end I would like to run and install future programs to my SSD and be able to always boot from the SSD not the SD card.
Hopefully my question makes sense.
This article resolves all your issues.
Thank you for the write up!
Can I do this with two or more SSDs?
I am thinking to have the OS on one SSD and then two more dedicated to storage.
Would I plug all three into a powered hub?
Or would I plug the SSD with the OS on it to one of the USB 3.0 ports and then the other two to a powered hub (and into the other USB 3.0 on the pi)?
Will this procedure work on a Raspberry Pi 3?
Is raspian required in order to boot from USB?