In this segment, we are going to show you “how you can set up Raspberry Pi 4 from USB/SSD without using any SD Card.”
What is Raspberry Pi?
 |
Raspberry Pi (/paɪ/) is a series of small single-board computers developed in the United Kingdom by the Raspberry Pi Foundation to promote the teaching of basic computer science in schools and in developing countries. The original model became far more popular than anticipated, selling outside its target market for uses such as robotics. It now is widely used even in research projects, such as for weather monitoring because of its low cost and portability. |
- It does not include peripherals (such as keyboards and mice) or cases. However, some accessories have been included in several official and unofficial bundles.
- After the release of the second board type, the Raspberry Pi Foundation set up a new entity, named Raspberry Pi Trading, and installed Eben Upton as CEO, with the responsibility of developing technology. The Foundation was rededicated as an educational charity for promoting the teaching of basic computer science in schools and developing countries.
- The Raspberry Pi is one of the best-selling British computers. As of December 2019, more than thirty million boards have been sold. Most Pis are made in a Sony factory in Pencoed, Wales, while others are made in China and Japan.
Source//Wikipedia
Software Required :
For this Practical, we need a Raspberry pi 4 board with Raspberry Pi OS Desktop version installed.
| Equipment Required | Optional | ||
| Raspberry Pi 4 | Case | ||
| SD Card | Raspberry Pi Keyboard | ||
| Ethernet Cable | Mouse | ||
| Power Adapter | |||
| External HDD | |||
| Shop now | |||
- To start the practical first, we need to update and upgrade the system. Followed by RPI-update to get the latest Firmware updates as well.
sudo apt update
sudo apt upgrade
sudo rpi-update
sudo reboot
- Once the process complete then we can go ahead and reboot the system.
- After the system reboot completes, we can go ahead and start installing RPI-EEPROM and edit its file and replace critical updates to beta updates.
sudo apt install rpi-eeprom
sudo nano /etc/default/rpi-eeprom-update
- Now we can use crtl-x and Y, to save the file configuration.
sudo rpi-eeprom-update -d -f
sudo rpi-eeprom-update -d -f /lib/firmware/raspberrypi/bootloader/beta/pieeprom-2020-05-15.bin
- Once the file saved successfully, then we can go ahead and update the RPI-EEPROM to beta updates by using the above commands. Then we can reboot the system again.
- Now we are ready to check out the latest BootLoader version by using below given command.
vcgencmd bootloader_version
Result:
- Once we are on the latest boot version i.e of the latest month, then we can check the BootLoader config.
vcgencmd bootloader_config
Result:
- Here we need to check for BOOTORDER=0xF41. Here, 4 stands for booting from USB, and 1 is booting from the SD Card.
Once all the above processes completed successfully then we can go ahead and connect a USB/SSD to our Raspberry Pi 4 to copy the SD Card into the USB drive. 
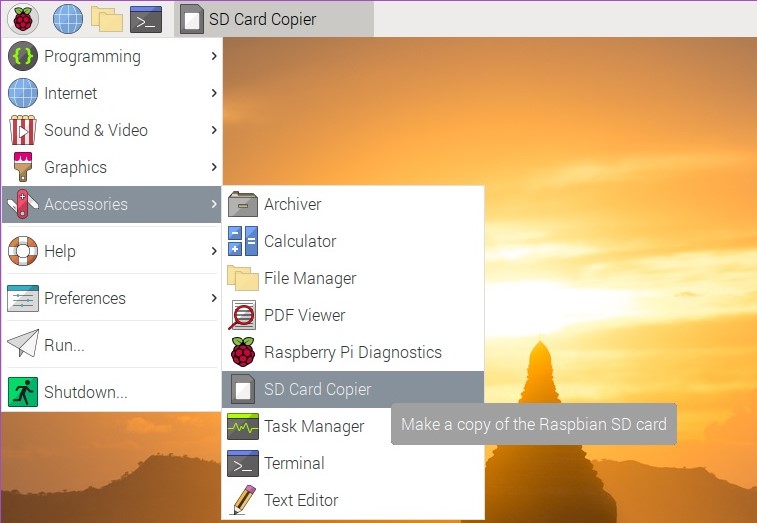
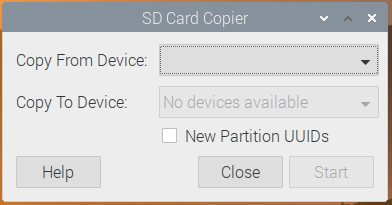
- To initiate this process we need to navigate on to Raspberry Pi icon and move to Accessibility then open SD Card Copier. Here we need to select our SD Card in Copy From Device and then Copy To Device will be our USB drive.
- And then we need to hit start it will take around 5 minutes to complete the process.
- Now, we need to turn off the Raspberry Pi either from Terminal or from Pi icon. Then wait for the Pi to completely turn off and then remove the SD Card and leave the USB drive in the Pi.
- At this stage, we are ready to boot our system from the USB drive. Now you can turn on the Pi and it will boot into Raspberry OS from the USB drive.
- Note: If the system fails to boot from USB/SSD we can go ahead and copy all .elf and .dat files from our SD card into the boot directory of our new USB/SSD.
In conclusion
- You are all set to Boot your Raspberry pi 4 from a USB/SSD drive for better performance.
- Enjoy using Raspberry Pi, share your thoughts about the article.
Did you find us helpful?
| Subscribe our YouTube Channel | |
| Support us on Patreon | |
| Like us on Facebook | |
| Share This Article with others | |


Turn off your Ad-Blocker. OK, Then I put on Pi-Hole – no more stupid ads. Simples.
No SD card required, your description sais, but this is a blatant lie. As an SSD is required to execute this tutorial
Initially, you required SD card but once you move the data to USB/SSD. Then you don’t require SD Card.
deleted!
Thanks for this article. This solves the issue I was having with my Pi4. I kept having stability issues running on my SD card. Running much better on USB. Thanks again
Welcome
I got a kernel panic.
I used the default 3A raspberry usb power cable. After I added a powered usb hub between my pi4 and ssd disk it worked.
Can this work Raspberry pi 3
Yes but method might be diffrent please google.
Can you mount a networkdrive while you running Raspberry Pi 4 Boot from USB/SSD ?
I followed your https://pcmac.biz/mount-external-hard-drives-on-raspberry-pi-all-models/
but even that won’t work well