In this segment, we are going to she you how to set up a “Simple DNS AD-Blocker for Raspberry Pi all models”
DNS AD-Blocker?
DNS Ad-Blocker is a lightweight dnsmasq DNS server to blocks traffic to known ad servers with optional DNSCrypt support. Supports x86_64 and Raspberry Pi (armhf).
This image is using the blacklists created by oznu/dns-zone-blacklist and StevenBlack/hosts.
The DNS server works by returning NXDOMAIN when a DNS lookup is made by a browser or device to a blacklisted domain. This tells the browser the DNS record for a domain name could not be found which means the browser won’t even attempt a connection.
If you have found a host you think should be blacklisted please submit an issue on the upstream blacklist, StevenBlack/hosts, as the aim of this project is not to maintain yet another blacklist.
Recommended Articles
Full credit for this tutorial goes to oznu
OpenMediaVault Versions :
OpenMediaVault 5 Installation Guide :
https://pcmac.biz/openmediavault-5-on-raspberry-pi/Software Required :
| Equipment Required | Optional | ||
| Raspberry Pi 4 | Case | ||
| SD Card | Raspberry Pi Keyboard | ||
| Ethernet Cable | Mouse | ||
| Power Adapter | |||
| External HDD | |||
| Shop now | |||
- To start the practical we need to use the below-given parameters, either we can SSH Raspberry Pi and use the below-given command as shown in the video or we can go ahead and configure the container using Portainer.
Parameters
docker run --restart=always \
  -p 53:53/tcp -p 53:53/udp \
  -e DEBUG=0 \
  -e NS1=1.1.1.1 -e NS2=1.0.0.1 \
  -e AUTO_UPDATE=1 \
  -e BRANCH=master \
  -e DNSCRYPT=0 \
  -v </path/to/config>:/config \
  oznu/dns-ad-blocker:armhf
- To resolve the Port 53 bind issue, you need to use the below-given commands.
sudo systemctl disable systemd-resolved.service
sudo systemctl stop systemd-resolved
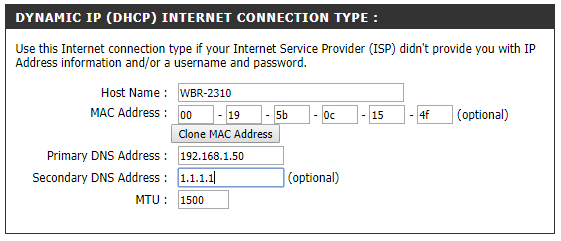
- Once the setup finishes we can go ahead and update our router DNS setting to our OpenMediaVault Address.
DNSCrypt
- DNSCrypt is a protocol that authenticates communications between a DNS client and a DNS resolver. It uses cryptographic signatures to verify that responses originate from the chosen DNS resolver and haven’t been tampered with.
Updating DNS AD-Blocker IP Address to Router DNS
- Now, we need to log in to our Router and then Navigate to DNS Settings.
- Followed by, entering the OpenMediaVault IP Address to our Router Primary DNS Address.
- After that, the traffic can route through the Raspberry Pi and Block ads with Pi-Hole.
Primary DNS Address   : "OpenMediaVault IP Address"
Secondary DNS Address : "Cloudflare DNS Address i.e 1.1.1.1"
In conclusion
- You are all set to use Raspberry Pi as a DNS Ad-Block Server.
- If you face any issues regarding this article please share your thoughts.
- Enjoy the AD-free web browsing experience with your Raspberry Pi and Openmediavault.
Did you find us helpful?Please support us on Patreon, Follow us on Facebook |


