In this segment, we are going to demonstrate “how to set up your Pi-Hole on OpenMediaVault in a really simple technique.
What is OpenMediaVault?
 | OpenMediaVault (OMV) is a free Linux distribution designed for network-attached storage (NAS). The project’s lead developer is Volker Theile, who instituted it in 2009. OMV is based on the Debian operating system and is licensed through the GNU General Public License v3. |
What is Pi-Hole?
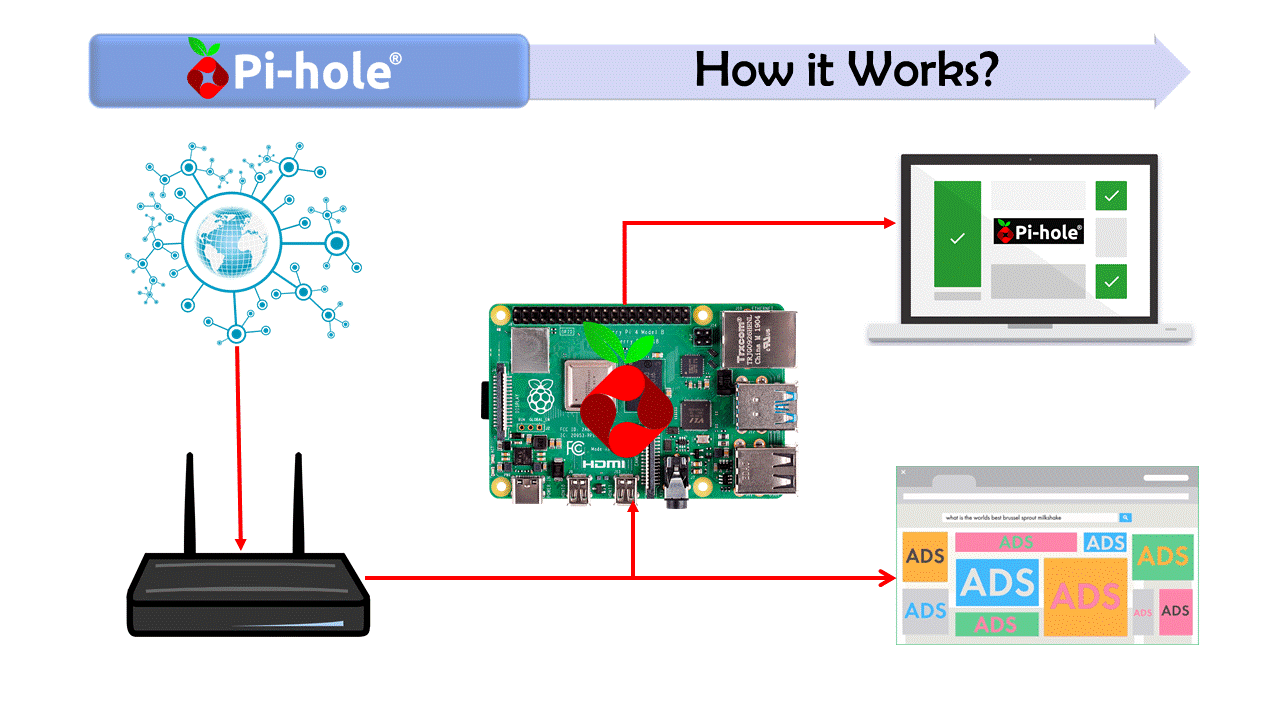
Pi-hole is a Linux network-level advertisement and Internet tracker blocking application that acts as a DNS sinkhole (and optionally a DHCP server), intended for use on a private network. It is designed for use on embedded devices with network capability, such as the Raspberry Pi, but it can be used on other machines running Linux and cloud implementations. Pi-hole can block traditional website adverts as well as adverts in unconventional places, such as smart TVs and mobile operating system adverts. |  |
Source /> Wikipedia
OpenMediaVault Versions :
OpenMediaVault 5 Installation Guide :
Software Required
| Equipment Required | Optional | ||
| Raspberry Pi 4 | Case | ||
| SD Card | Raspberry Pi Keyboard | ||
| Ethernet Cable | Mouse | ||
| Power Adapter | |||
| External HDD | |||
| Shop now | |||

Checkout official website: pi-hole
Docker-compose
version: "3"

# More info at https://github.com/pi-hole/docker-pi-hole/ and https://docs.pi-hole.net/
services:
  pihole:
    container_name: pihole
    image: pihole/pihole:latest
    ports:
      - "53:53/tcp"
      - "53:53/udp"
      - "67:67/udp"
      - "80:80/tcp"
      - "443:443/tcp"
    environment:
      TZ: 'Asia/Kolkata'
      # WEBPASSWORD: 'set a secure password here or it will be random'
    # Volumes store your data between container upgrades
    volumes:
       - './etc-pihole/:/etc/pihole/'
       - './etc-dnsmasq.d/:/etc/dnsmasq.d/'
    dns:
      - 127.0.0.1
      - 1.1.1.1
    # Recommended but not required (DHCP needs NET_ADMIN)
    #   https://github.com/pi-hole/docker-pi-hole#note-on-capabilities
    cap_add:
      - NET_ADMIN
restart: unless-stoppedNote: Please change the OMV default port from 80 to something else and then start with
sudo apt update
sudo apt dist-upgrade
In our last tutorial, we have shown you how we have set up Pi-Hole with a Dedicated IP Address on OpenMediaVault. But this time we are going to use OMV IP Address to configure Pi-Hole
- By using this method we can easily eliminate lots of steps and resolve plenty of mess for everyone.
Issues faced in the Last Build.
The container stopped working after some time.
Pi-Hole won’t start after a System reboot or Container restart.
- To resolve all these issue lets begin installing Pi-Hole.
Step 1: Download the Official Pi-Hole Docker image
- To download the Pi-Hole image we need to click on the images section from the right panel and then pull the latest image from pihole/pihole:latest.
- Followed by clicking on pull the image to download the latest pihole image.
Step 2: Add the Pi-Hole Container
- After that, we need to move to containers from the right side of the screen and click on add container. Then we need to enter the name for our image, PiHole, and select the Pi-Hole image.
- Now we need to Publish five new ports as mentioned in Docker-compose.
- To resolve the Port 53 bind issue, you need to use the below-given commands.
sudo systemctl disable systemd-resolved.service
sudo systemctl stop systemd-resolved
Step 3: Add container path and Bind the host volumes
- Once all the ports configured successfully then we need to navigate to volume and create these volumes as mentioned below.

Step 4: Configure the network for Pi-Hole
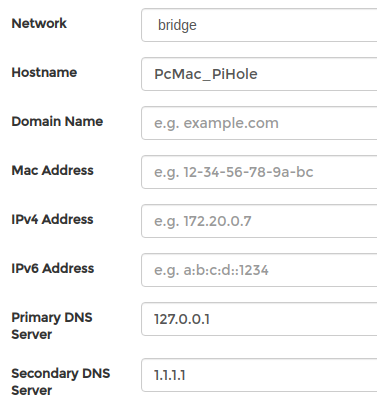
- Followed by navigating on to the network and Leave it in bridge mode. After that type a Hostname for your Pi-Hole and type Primary DNS Serer and Secondary DNS server as mentioned below.
Step 5: Configure the Environment variable
- In this step, we need to add three Environment Variable as mention below. Please change the values according to your requirements.
- Followed by clicking on Restart Policy and select Unless stopped.
Step 6: Access Pi-Hole Server Web Interface
- To access the Pi-Hole web interface we need to type the OpenMediaVault IP Address/admin.
- But our Pi-Hole is not yet ready for blocking Ads on our Network.
- To block the Ads on the Network we need to update OpenMediaVault IP Address to our Router DNS.

http://OpenMediaVault IP Address/admin/
Step 7: Updating Pi-Hole IP Address to Router DNS
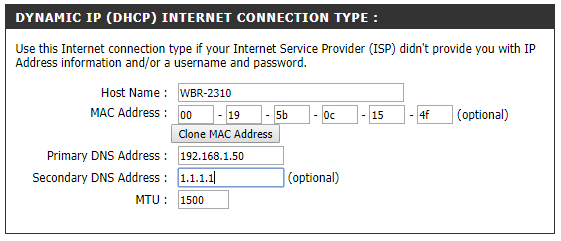
- Now, we need to log in to our Router and then Navigate to DNS Settings.
- Followed by, entering the OpenMediaVault IP Address to our Router Primary DNS Address.
- After that, the traffic can route through the Raspberry Pi and Block ads with Pi-Hole.
Primary DNS Address   : "OpenMediaVault IP Address"
Secondary DNS Address : "Cloudflare DNS Address i.e 1.1.1.1"
Step 8: Reset Pi-Hole Password
- In case, if you forgot the Pi-Hole password you can reset it anytime by using this command.
docker exec -it pihole pihole -a -p
In conclusion
- You are all set to use Raspberry Pi 4 as Pi-Hole Network Wide Ad-Block Server.
- If you face any issue regarding this article please share your thoughts.
- Enjoy using Pi-Hole on Docker using Openmediavault.
- Smile (.”_”.)
Please check out my other articles:
- How to install OpenMediaVault 5 on Raspberry Pi All Models
- OpenMediaVault 5 NAS Server on Raspberry Pi 4
Did you find us helpful?
| Subscribe our YouTube Channel | |
| Support us on Patreon | |
| Like us on Facebook | |
| Share This Article with others | |


Hi, thank you for this guide! I have 2 questions.
1) I set my router to give pihole ip as dns server to the clients into dhcp settings. Do I have to set also the pihole ip to the router itself for its connection to internet? I noticed that we configure pihole to have “real” dns, like 1.1.1.1 to go to internet, so it could be correct.
2) We are using pihole:latest image, but how and when happens the update to be sure to have always the latest version? It is automatic? Maybe this is a general question, applicable to all dockers.
Thank you again.
The image update automatically. The pi-hole got the internet from the router and other traffic bypasses through the router. 1.1.1.1 is required if pi-hole fails so internet can still work with the secondary DNS server.
Hi Harish,
Many thanks for your guide. It has helped me a lot. I followed your youtube steps and could get it working after I ran the steps to resolve port 53 bind issue.
Can I please ask a question? I did not do Step 3 above (Add container path and Bind the host volumes) but everything seems to be working (I can see it blocking domains, I can load more sites to blacklist, I can add whitelist etc.).
Qn: Do I need to do step 3? And what would happen if I did not do it? Thanks in advance. Ha, ha. Reason that I did not do step 3 is that I am still not sure how to do it.
Thank you.
Kind regards,
Cheong
Thank you!! I got through 4 Tutorials to install pihole via portainer on omv. This is the first that worked! Thanks a lot!!
Welcome
How you handle IPv6? All is working fine with IPv4… But most of the sites are loading via IPv6. Thanks, Great Tutorial!