In this segment, we are going to show you “A Step-by-Step Guide for Free Android 13 Installation on Raspberry Pi | Easy Setup”.
In the world of technology enthusiasts and DIYers, the Raspberry Pi has emerged as a versatile and affordable platform for experimenting with various computing projects. From building retro gaming consoles to home automation systems, the Raspberry Pi has proven its potential time and again. One exciting project that has garnered attention is the installation of Android OS on a Raspberry Pi device. In this guide, we will walk you through the process of installing Free Android 13 on a Raspberry Pi using Emteria OS, unlocking a world of possibilities for your mini-computing powerhouse.
What is Emteria OS?
Emteria OS is a specialized Android operating system designed to run on a variety of devices, including Raspberry Pi. It offers a stable and optimized Android experience, making it a perfect choice for Raspberry Pi enthusiasts who want to transform their mini-computers into fully functional Android devices.
Recommended Articles
Prerequisites:
Before you start, ensure you have the following:
Software Required
Equipment Required | Optional | ||
| Raspberry Pi 4 | Case | ||
| Power Adapter | |||
| SD Card 16 GB or more | |||
| Card Reader | |||
| Keyboard | |||
| Mouse | |||
 | |||
Step-by-Step Installation Guide
Step 1: Download Raspberry Pi Imager
Begin by downloading and installing the Raspberry Pi Imager from the official Raspberry Pi website (https://www.raspberrypi.org/software/). This tool simplifies the process of flashing operating systems onto microSD cards.

![]()
Step 2: Flash the MicroSD Card
Insert the microSD card into your computer’s SD card reader and launch the Raspberry Pi Imager. Follow these steps:

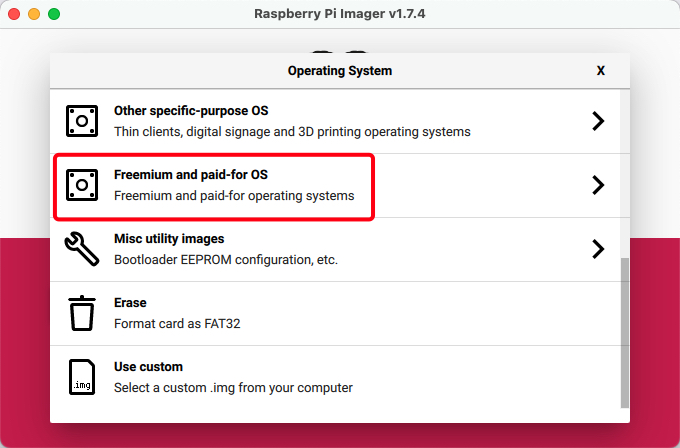
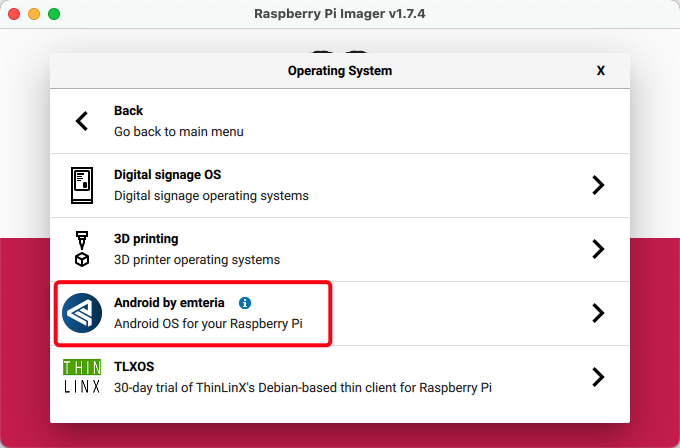
- Choose the operating system: Select “Freemium and paid-for OS” and then navigate to “Android by Emteria“.
- Choose your microSD card: Make sure you select the correct card, as all data on it will be erased during the process.
- Write the image: Click “Write” to flash the Android 13 image onto the microSD card.
Step 3: Configure Your Raspberry Pi
- Insert the microSD card into the Raspberry Pi.
- Connect the necessary peripherals (monitor, keyboard, mouse, etc.).
- Power on the Raspberry Pi by plugging in the power supply.
Step 4: Android 13 Setup
Follow the on-screen instructions to set up Android 13 on your Raspberry Pi. This typically includes selecting your language, connecting to Wi-Fi, and don’t activate the OS as we are using the Free version.

Exploring Android 13 on Raspberry Pi
Congratulations! You’ve successfully installed Android 13 on your Raspberry Pi. Now, you can explore the Android ecosystem on a different platform. Keep in mind that community-developed builds might have certain limitations, and not all features may work seamlessly.
Conclusion
The fusion of Android 13 and the Raspberry Pi opens up a world of possibilities for tech enthusiasts, hobbyists, and developers. The Raspberry Pi’s affordability and versatility, coupled with Android’s rich app ecosystem, create a unique opportunity to experiment and innovate beyond the confines of traditional devices. With the user-friendly Raspberry Pi Imager tool and a compatible Android image, you can embark on this exciting journey and explore the potential of running Android on a Raspberry Pi.
Did you find us helpful?Support us on Patreon, Follow us on Facebook, & Subscribe on YouTube. |  |  |  |  |
