In this segment, we are going to show you “DietPi Installation on Raspberry Pi & Move User Data from SD Card to External Drive.”
What is DietPi?
DietPi is an extremely lightweight operating system, start at 400MB in size (3x lighter than ‘Raspbian Lite’). With features of low process/memory footprint and DietPi-RAMlog installed by default, DietPi allows you to get the maximum performance from your device. Source// DietPi |  |
Software Required :
| Equipment Required | Optional | ||
| Raspberry Pi 4 | Case | ||
| SD Card | Raspberry Pi Keyboard | ||
| Ethernet Cable | Mouse | ||
| Power Adapter | |||
| External HDD | |||
| Shop now | |||
Step 1: Installation
- First of all, we need to Download the DietPi image from the download links. Then we require an SD Card to flash the image
Step 2: Formatting the SD Card
- Now, We need an SD Card Formatter tool to format the SD card.
- Once, We plugged in the SD Card to the computer software will automatically detect the SD Card then you need to click on the format to format the Card.
Step 3: Flashing the SD Card
- After the SD card formatted successfully then we use Etcher and flash the DietPi image to the SD card.
Step 4: Setting up Raspberry Pi
- Now we need to plug in the SD card, connect the Ethernet Cable, Power Supply to complete the setup, and turn on the Raspberry Pi device it will take up to 2 minutes to boot the DietPi operating system.
- After that, we need to run Wireless Network Watcher to check the IP Address of Raspberry Pi.
Connecting to Raspberry Pi using SSH
- Now, we got the IP address for our DietPi we can go ahead and open Putty then type the IP Address to connect to DietPi.
Default Username : root
Default Password : dietpi
- Once, we connected to the DietPi then it requires us to change the Root Password and Unix Password. I recommend you put the same password in both places.
DietPi Installation of Minimal Image
- After we logged in to DietPi, then you need to type a command to access the dietpi-software.
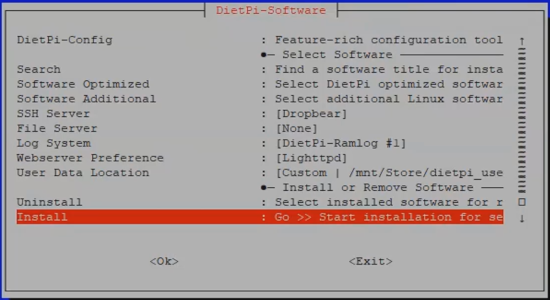
- Now, we need to navigate to Install and press OK. After that installation will take around 15-20 min to complete the setup.
- Once the setup completes the system will reboot to finalize the settings and you are ready to use your DietPi Image.
Format & Mount External Storage
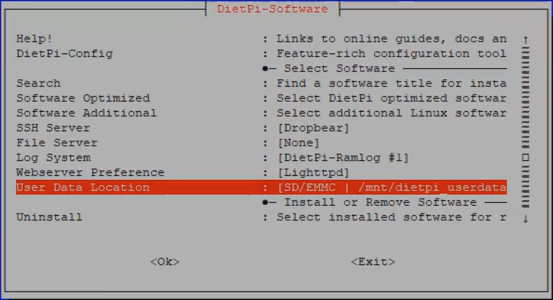
- To Format & Mount the SD card, we need to select the option User Data Location.
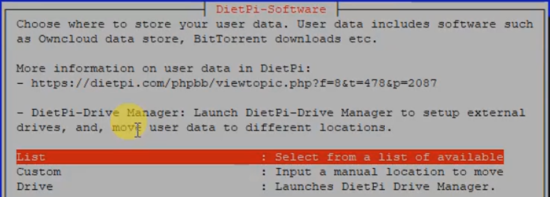
- Once, we open User Data Location, it will generate a list of 3 options for us List, Custom & Drive. From these options, we need to select Drive and press OK.
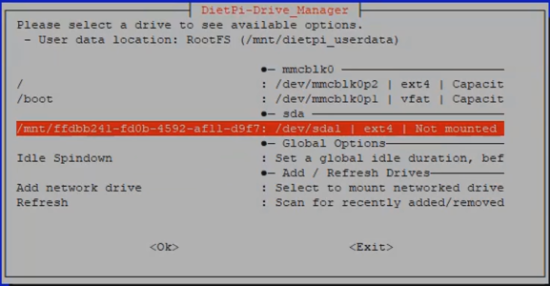
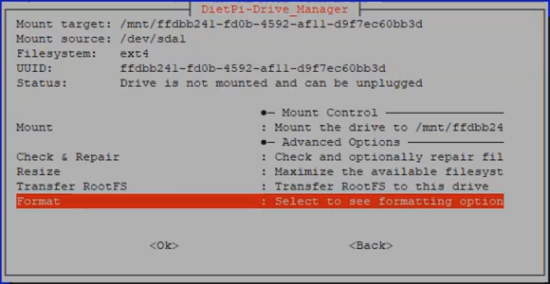
- This will bring the list of connected drives to our raspberry pi. From here we need to select the drive which is listed under sda and press OK to select the drive.
- After that, we need to navigate to Format the drive and once the format is done the drive will mount automatically.
- Once, the format finish, it will provide us with the option to enter the path of the drive. You can either choose the default path or you can type a drive name of your choice.
- In my case, I named my drive as Store then press OK.
Move User_Data to External Storage
- Now, we need to select List and press OK.
- After that, we need to select our External Drive. In my case, it is /mnt/Store.
- Now, when we press ok the user data will start the transfer
From : /mnt/dietpi_userdata To : /mnt/store/dietpi_userdata. i.e to our External Hard Drive.
- This will finish moving data from SD Card to External Drive. As you can see in the picture User Data Location is now [Custom | /mnt/store/dietpi_userdata.
In Conclusion
- You are all set to use DietPi on your Raspberry Pi.
- In the future, we are going to install other packages and check their working on DietPi.
- If you face any issue regarding this article please share your thoughts.
- Enjoy using DietPi on Raspberry Pi.
Did you find us helpful?
| Subscribe our YouTube Channel | |
| Support us on Patreon | |
| Like us on Facebook | |
| Share This Article with others | |











I am trying to make a cluster but unable to get my rock64 to broadcast. I do not won’t to make a nas is this possible I am a novices my first time .deitpi look fantastic and that what I would like to use thank you advance for any help