What is OpenMediaVault?
 | OpenMediaVault (OMV) is a free Linux distribution designed for network-attached storage (NAS). The project’s lead developer is Volker Theile, who instituted it in 2009. OMV is based on the Debian operating system and is licensed through the GNU General Public License v3. |
Software Required :
| Equipment Required | Optional | ||
| Raspberry Pi 4 | Case | ||
| SD Card | Raspberry Pi Keyboard | ||
| Ethernet Cable | Mouse | ||
| Power Adapter | |||
| External HDD | |||
| Shop now | |||
OpenMediaVault 5 Installation Guide :
Access OpenMediaVault Web Interface
- In the beginning, to access the OMV Web Interface we need the IP Address of our Raspberry Pi.
- Followed by Wireless Network Watcher to find the IP Address as shown below.

- After that, use this IP Address to open the login page for OpenMediaVault.
- Now, enter the Username & Password and login to OpenMediaVault.
OpenMediaVault Address = Your Raspberry Pi IP Address In my case 192.168.1.73

Default Username : admin
Default Password : openmediavault
OpenMediaVault Configuration
- Firstly, you need to change Auto logout to Disabled.
- Secondly, change the Web Administrative Password to a strong password of your choice.
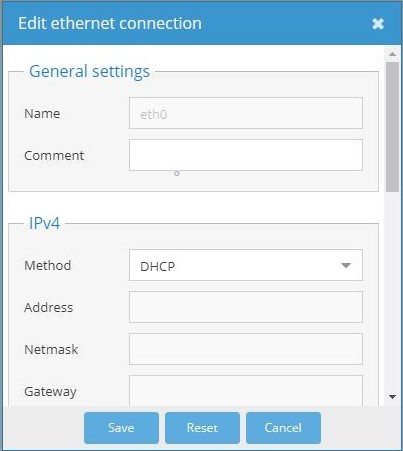
- Thirdly, navigate to System > Network and add an Ethernet interface.
- Under General Settings, we need to select our eth0 Ethernet Interface.
- After that under IPv4, we need to select DHCP and save the configuration.
- Finally, we need to navigate to services to SSH enable Permit root login
Accessing SSH Console
- Before start to access the SSH console we require putty and use OpenMediaVault IP Address for Login to SSH.
Default Username : root
Default Password : openmediavault
- After that, on the first login, you need to change the password.
- Once the password is changed you can start using SSH on OpenMediaVault
Creating SSL Certificates
- First of all, we need to navigate to Certificates under System Settings.
- Followed by creating an SSH Certificate under the SSH menu by pressing the ADD button.

- Then we need to type a Name for the Certificate and press save to save the settings.
- After that, we need to navigate to SSL and create an SSL certificate by filling up the details to save the settings.

- Finally, we need to navigate to General Settings to select our certificates and Enable SSL/TLS connection

Enable SSL/TLS : "Enable Secure Connection"
Certificate : "Choose the certificate which we have Created"
Port : 443
Force SSL/TLS : "Enable"
Access OpenMediaVault from Internet
- To access the OpenMediaVault from Internet, we need to complete 2 steps.
1. Port Forwarding
2. Setup Dynamic DNS [In case you don't have a Static Public IP Address]
Setting up Port Forwarding on Router
- Firstly, we need to know the IP Address of our router to forward the ports.
- After that, we can use the Wireless Network Watcher to obtain the router IP Address as shown below.

- Secondly, use this IP Address to your browser and it will open the login page for your router.
- Thirdly, you need to enter the username & password and login to your router.
- If you don’t know the username & password of your router you can always ask your ISP.
- For personal routers check online for default username & password.

- Finally, navigate to services and then move to Port Forwarding, Your’s might be different.
- Then you need to forward port 80 and 443, to the Raspberry Pi IP Address.
Setting up Dynamic DNS
- Initially, we need to visit the DUCKDNS website to create a Free Dynamic DNS Domain.

- After that, login into DUCKDNS from the above methods and create a sub-domain.

- For example, I have created omvpcmac as my subdomain, i.e. omvpcmac.duckdns.org
- You can create 5 subdomains on the Duck DNS account for free.
- Finally, we are all set to access OMV from the Internet by using the sub-domain that we have created.
In Conclusion
- Now you can access OpenMediaVault from outside your network.
- Enjoy using OpenMediaVault on Raspberry Pi.
- If you have any suggestions, please mention them in the comment section.
Please check out my other articles
Did you find us helpful?Support us on Patreon, Follow us on Facebook |  |  |  |  |

Thanks for the tutorial and the video, its very detailed and helpful. One thing that I couldn’t understand is how did you link the ddns to OMV ? is there a plugin or a service in OMV that you enabled ?
Thanks
please video omv5 access from anywhere without anyh additional hardware,like rasbery pi,putty or etc.immiediateyly need this video